Do It Yourself Sod Installation
Helpful “step-by-step” guide to installing your own sod
Sod and Soil Preparation
 STEP 1 - Measure Your Lawn
Measure the area of your lawn; we recommend writing this down. The length x width determines how
many square feet of sod you need.
Delta Bluegrass sod rolls measure 10 square feet each therefore you will need to round up the closest
increment. We recommend ordering 5-10% more of your measurement for odd-shape areas.
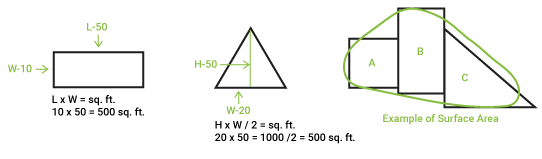
Area B is 15 ft. x 20 ft.
Area C is a triangle
12 ft. x 20/2
TOTAL SOD NEEDED
= 300 sq. ft.
= 120 sq. ft.
= 520 sq. ft.
 STEP 2 - Remove Your Existing Lawn
Prior to installation of new sod, any existing lawn should be chemically killed and removed. Use a sod
cutter which will cut under the turf and slice it into strips. Water the area a few days in advance
to make the soil easier to work. Soil should be moist but not soggy. After removing the old sod, rake
over the soil to remove debris. For best results, water the bare ground for up to a week and re-apply
herbicide to kill off any re-growth.
Sod Installation Instructions
 STEP 1 - Apply Starter Fertilizer
Before laying sod, apply Bolero™ 8-16-16 Sod & Seed STARTER fertilizer to the entire surface
to be covered with sod. This ensures all the vital nutrients are available for your new sod to
root into the soil. Bolero™ Sod & Seed STARTER provides the nutritional boost that encourages
a deeper root system for your grass.

 STEP 2 - Installing Your Sod
Install your new sod immediately! Sod is a perishable product and should be installed within 24
hours of delivery.
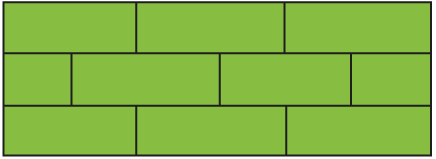
Your sod should be laid directly on the fertilized soil. Start from the back of your property line to front
along the longest straight-line. Work away from the line so you’re not stepping on the fresh sod. Make
sure sod edges fit tightly together. Always place sod rolls at the edge of your area and work toward
the center. Stagger sod slabs (like laying bricks) to offset seams. Should your area be irregular in
shape, run a string between stakes in a straight line through the area and begin laying sod along this
line. Make sure each piece of sod has good contact with the soil, because air pockets prevent proper
rooting. If laying sod on a steep slope, use wooden pegs or sod staples to temporarily keep the sod
in place. Sod should be placed horizontal across sloped areas.
Trim edges with your sod knife to fit around curves and leave clean, trimmed edges around sprinkler heads,
driveways, etc. Avoid cutting sod into short or narrow strips because smaller pieces tend to dry out
and fail to root properly.
Pro-Tip!
You do not want your new sod to dry out! Make sure your soil is moist before laying sod and mist sod with a garden hose as small sections are completed.